Calcpad is a handy tool for writing engineering calculation notes. You can simply type your formulas and text (in quotes) on the left side and get your report calculated and formatted on the right. Then you can print it or send it to MS Word, Libre Office or a PDF file.

However, if you have a long and complicated problem or need to share it with other users, working directly with the source code is not the most practical way. First, there is a risk to damage the code by making inappropriate changes. Second, it may be difficult to identify what is input data and what is not, especially if you are not the author.
Basic input forms
That is why, Calcpad provides an option for easy creation of Html forms for data input. All you have to do is to put a question mark “?” wherever you need a value to be entered. After it, add the default value in curly brackets, as follows:
"Stress in Simply Supported Beam
'Length -'L = ? {5}m
'Cross section
b = ? {250}mm','h = ? {500}mm
'Loads -'q = ? {10}kN/m','N = ? {0}kN
...
Then, press F4 or the “Compile to input form” button (on the left of the “Run” button) to generate the form. You will get the following result:
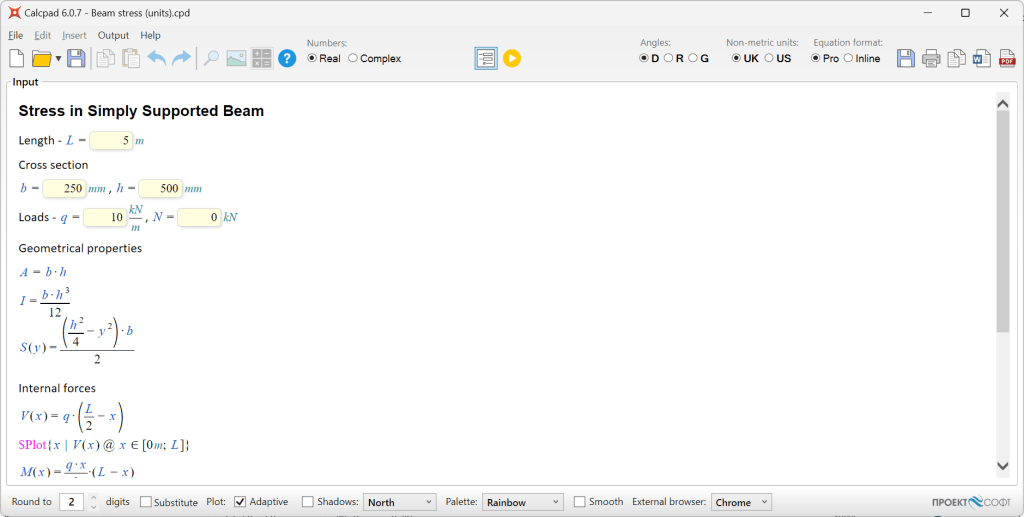
Calcpad will display the uncalculated Html output, where all question marks are replaced by input fields. The source code will be hidden and not accessible anymore. You will have to press again F4 or toggle the same button back to unlock it. Once in input mode, you can enter the input data safely and run the calculations by pressing F5.
Probably, you may not want to see all this uncalculated output during the input. For that purpose, Calcpad provides you with special switches to specify what to be visible on each stage:
#pre – the contents after the current line will be visible only in input phase;#post – the contents will be visible only in results phase;#hide – the contents will be hidden in both phases;#show – the contents will be visible in both phases.
If you insert #post before “Geometrical properties”, you will hide the remaining contents during the input phase. Add some images, compile again, and you will get a nice and friendly input form, like the one bellow:

Advanced Html forms
Besides text input fields, Calcpad allows more advanced UI elements like selection lists, radio buttons and checkboxes. Unlike text fields, they are not generated automatically. You have to use Html to insert them. If you are not familiar with Html, you can use various online resources to learn the basics, like https://www.w3schools.com/html/
Unlike text fields, Calcpad does not support other UI elements natively. It can read values only from text fields. That is why, you should link all other elements to some “target” text fields. The latest will be used by Calcpad to fill the input data from the source UI elements, after the user makes some selection. This is performed automatically by predefined JavaScript code in the Calcpad Html template.
Although it looks a bit complicated, there is an easy way to start. Calcpad provides ready made code snippets in the Insert -> Html UI menu.

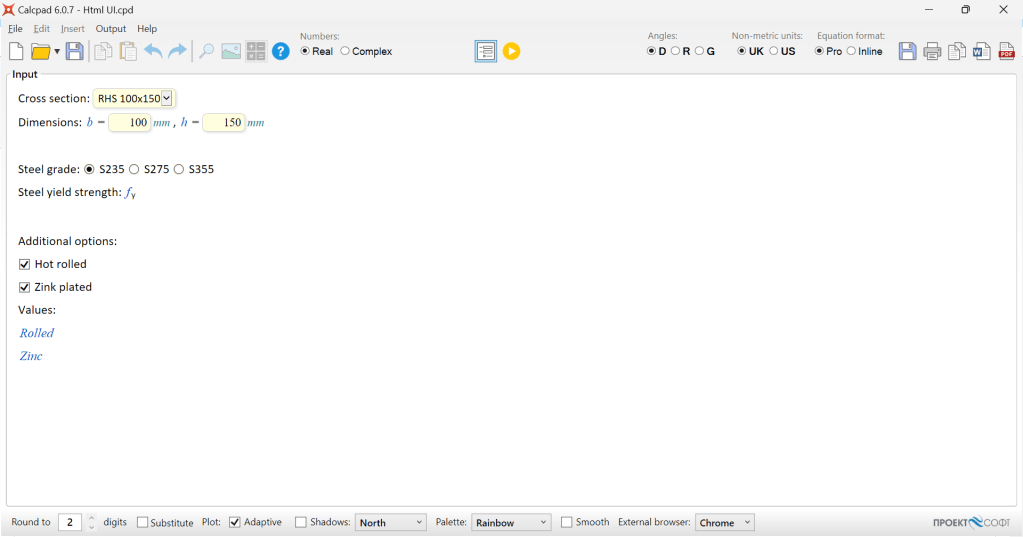
Then you can play with the generated code to see how it works and modify it according to your needs. We will use this approach to create a small example for selection of steel sections, material grade and fabrication method (cold formed or hot rolled) for the selected section.
Selection
Inserted code:
'Select an option: <select name="target1">
'<option value="11;12">x1; y1</option>
'<option value="21;22">x2; y2</option>
'<option value="31;32">x3; y3</option>
'</select>
'<p id="target1"> Values:'x = ? {21}','y = ? {22}'</p>
Modified code:
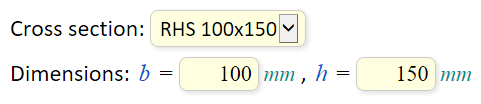
'Cross section: <select name="section">
'<option value="100;150">RHS 100x150</option>
'<option value="150;200">RHS 150x200</option>
'<option value="200;250">RHS 200x250</option>
'</select>
'<p id="section"> Dimensions:'b = ? {100}mm','h = ? {150}mm'</p>
Result:
Comments:
The select Html element must have an opening <select> and closing </select> tags. You can put inside as many options as you need. Each option also has opening and closing tags, which are <option> and </, respectively. Between them, you have to put the actual text that will appear in the list. The values should be specified inside the option>value="" attribute. You can have multiple values for each option. They must be numerical and separated by semicolons without spaces. Each option must include the same number of values as the number of the target input fields.
The target input fields must be enclosed with a paragraph Html element. It must have an id="" attribute that matches exactly the name="" attribute of the select element. You can make the default values for the input fields to be equal to the values of a certain option. Then, this option will be loaded by default at startup. If there is no matching option, the select element will be empty at startup.
Radio buttons
Inserted code:
'<p>Select:
'<input name="target2" type="radio" id="opt1" value="1"/>
'<label for="opt1">option 1</label>
'<input name="target2" type="radio" id="opt2" value="2"/>
'<label for="opt2">option 2</label>
'...
'<p id="target2">Value -'opt = ? {2}'</p>
Modified code:
'<p>Steel grade:
'<input name="steel" type="radio" id="S235" value="235"/>
'<label for="S235">S235</label>
'<input name="steel" type="radio" id="S275" value="275"/>
'<label for="S275">S275</label>
'<input name="steel" type="radio" id="S355" value="355"/>
'<label for="S355">S355</label></p>
'<p id="steel" style="display:none;">'f_y = ? {235}MPa'</p>
'Steel yield strength:'f_y
Result:

Comments:
The basic principle is similar to the select element. All radio buttons must have a name that matches the id of the target paragraph. After a radio is clicked, the contents of its value="" attribute will be filled in the text input after “fy =“. The label next of each radio is specified by a respective “label” element. Its for="" attribute should correspond to the id of the radio. If you want to hide the text field from the form and leave only the radio buttons, you should add a style="display:none;" attribute to the target paragraph.
Checkbox
Inserted code:
'<p><input name="target3" type="checkbox" id="chk1" value="3"/>
'<label for="chk1">Checkbox 1</label></p>
'...
'<p id="target3">Value -'chk = ? {3}'</p>
Modified code:
'<p><input name="Rolled" type="checkbox" id="roll" value="1"/>
'<label for="roll">Hot rolled</label></p>
'<p id="Rolled" style="display:none;">'Rolled = ? {1}'</p>
Rolled
Result:

Comments:
Unlike radio buttons, each checkbox must have exactly one target paragraph with an input field inside. When the checkbox is checked, its value is filled in the target input field. If unchecked, the target input field is reset to zero “0“.
You can find the complete code of the above example in our GitHub repository:
https://github.com/Proektsoftbg/Calcpad/blob/main/Examples/Demos/Html%20UI.cpd